수행기록퀘스트5
------------------------------------------------------------
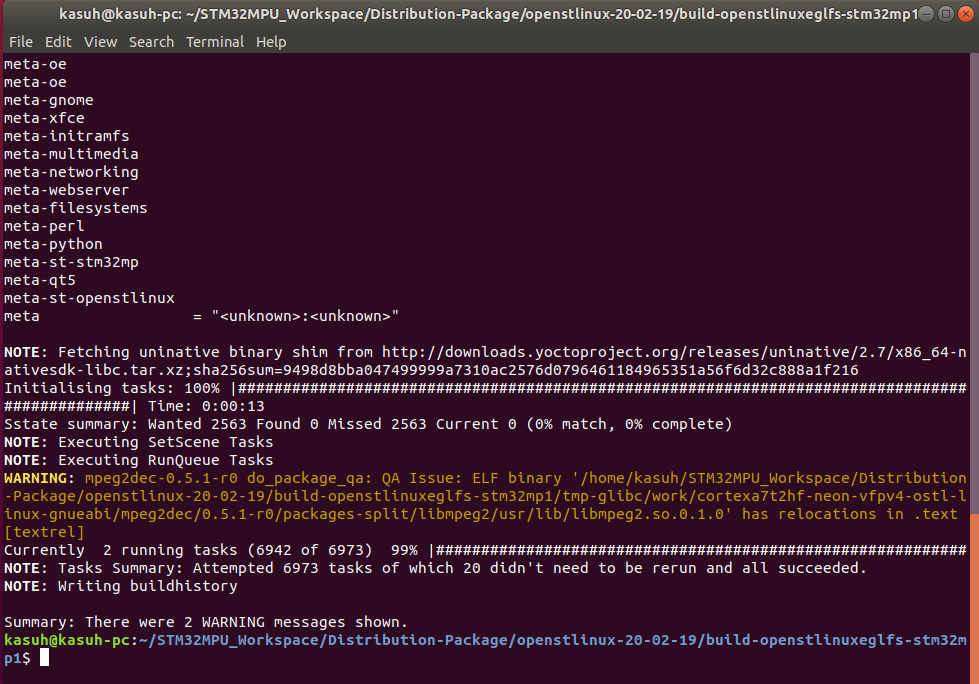
1. bitbake를 실행하여 성공한 결과 화면 제출
------------------------------------------------------------

------------------------------------------------------------
2. Desktop에서 Hello world 예제 실행 화면 제출
------------------------------------------------------------

------------------------------------------------------------
3. 보드 LCD에 출력된 Hello world 예제 실행 화면 제출
------------------------------------------------------------
------------------------------------------------------------
4. Hello World 예제 소스코드 제출
------------------------------------------------------------
main.cpp
#include <QGuiApplication>
#include <QQmlApplicationEngine>

int main(int argc, char *argv[])
{
    QCoreApplication::setAttribute(Qt::AA_EnableHighDpiScaling);

    QGuiApplication app(argc, argv);

    QQmlApplicationEngine engine;
    const QUrl url(QStringLiteral("qrc:/main.qml"));
    QObject::connect(&engine, &QQmlApplicationEngine::objectCreated,
                     &app, [url](QObject *obj, const QUrl &objUrl) {
        if (!obj && url == objUrl)
            QCoreApplication::exit(-1);
    }, Qt::QueuedConnection);
    engine.load(url);

    return app.exec();
}
main.qml
import QtQuick 2.11
import QtQuick.Window 2.11

Window {
    visible: true
    width: 480
    height: 800
    color: "#24ca30"
    title: qsTr("Quest5 : Hello World")

    Rectangle {
        id: rectangle
        x: 26
        y: 220
        width: 426
        height: 286
        color: "#fce94f"
        border.color: "#e53434"
    }

    TextInput {
        id: textInput
        x: 79
        y: 282
        width: 318
        height: 20
        color: "#e43535"
        text: qsTr("STM32MP157C-DK2")
        font.pixelSize: 20
        verticalAlignment: Text.AlignVCenter
        font.weight: Font.Bold
        horizontalAlignment: Text.AlignHCenter
    }

    TextInput {
        id: textInput1
        x: 173
        y: 444
        width: 167
        height: 0
        text: qsTr("Hello World !!!")
        font.bold: true
        font.pixelSize: 31
    }


}
-------------------------------------------------------------------------------------------------------------------------------------------------
---- 참고 사항
-------------------------------------------------------------------------------------------------------------------------------------------------
1. meta-qt5 build
Qt meta-layer check
$> DISTRO=openstlinux-weston MACHINE=stm32mp1 source layers/meta-st/scripts/envsetup.sh
$> bitbake-layers show-layers
(meta-qt5 가 있는지 확인한다)
st-example-image-qt 이미지 빌드
$> DISTRO=openstlinux-eglfs MACHINE=stm32mp1 source layers/meta-st/scripts/envsetup.sh
$> bitbake st-example-image-qt
(120G SDD(10G 여유)를 사용했는데, 계속해서 컴퓨터 멈춤현상 발생함.
250G SDD로 변경해서 모든 tool을 새로 설치하고 다시 Build하니 겨우 완료함.)
# Flashing the built image
(flash할 파일 위치(*.tsv) 는 아래에 위치함.)
/home/kasuh/STM32MPU_Workspace/Distribution-Package/openstlinux-20-02-19/build-openstlinuxeglfs-stm32mp1/tmp-glibc/deploy/images/stm32mp1/flashlayout_st-example-image-qt/FlashLayout_sdcard_stm32mp157c-dk2-basic.tsv
$> export PATH=/home/kasuh/STMicroelectronics/STM32Cube/STM32CubeProgrammer/bin:$PATH
$> STM32_Programmer_CLI --h
(command & version check)
(보드 boot mode 변경 : "00")
$> STM32_Programmer_CLI -l usb
$> STM32_Programmer_CLI -c port=usb1 -w flashlayout_st-example-image-qt/FlashLayout_sdcard_stm32mp157c-dk2-basic.tsv
--> 완료하면 화면이 이렇게 뜬다.
보드에 minicom으로 접속해서 psplash-drm-quit (DRM을 해제) 실행 하면 화면이 꺼진 것처럼 보임 : 당황하지 않기....)
2. Qt Project 생성 및 Design
Qt Creator를 설치하는데 많은 시간을 소비함. (5.11.3 설치 버전이 보이지 않아 헤멤. maintainace tool을 사용하여 설치함.)
main.cpp와 main.qml이 생성됨.
main.qml을 직접 edit해도 되지만, run한 화면과 보드 LCD에 display를 동일하게 하기 어려움.
쉽지 않으니 design을 사용하여 화면 design하면 좋음.
3. 보드 LCD에 출력
Qt Project를 Cross Compile 수행
$> DISTRO=openstlinux-eglfs MACHINE=stm32mp1 source layers/meta-st/scripts/envsetup.sh
$> cd ~/Qt_prj
$> devtool add qthello3 Test1/
NOTE: Recipe /home/kasuh/STM32MPU_Workspace/Distribution-Package/openstlinux-20-02-19/build-openstlinuxeglfs- stm32mp1/workspace/recipes/qthello3/qthello3.bb
$> devtool build qthello3
or ($> bitbake qthello3 )
보드에 실행 파일 전송하기 (전송된 파일이 어디에 위치하는지 몰라서 몇일을 고민함.)
$> devtool deploy-target -s qthello3 root@192.168.0.14
~~~~~(메세지) ~~~~~~~~
./opt/Test1/bin/Test1
NOTE: Successfully deployed /home/kasuh/STM32MPU_Workspace/Distribution-Package/openstlinux-20-02-19/build-openstlinuxeglfs-stm32mp1/tmp-glibc/work/cortexa7t2hf-neon-vfpv4-ostl-linux-gnueabi/qthello3/1.0-r0/image
~~~~~~~~~~~~~~~~~~~~~~~~~~~~~~
--> 보드에 전송된 실행 파일(Test1)은 /opt/Test1/bin에 위치한다.
root@stm32mp1:~# psplash-drm-quit (보드)
root@stm32mp1:~# /opt/Test1/bin/Test1 (보드)
<끝>
로그인 후
참가 상태를 확인할 수 있습니다.

