
질문과 답변
안녕하세요, 모두들 오미크론을 만나지 않고 건강하시리라 믿습니다.
너무 바쁘다보니 예제 자료도 빠르게 올리지 못했습니다.
드디어 테스트는 다 완료를 했습니다. 마감까지 컵받침의 마무리 수공작업을 끝내지는 못할거 같군요
저는 마감시간이 지나더라도 이 작품을 끝까지 마무리해서 DIY키트로 만들어볼 생각입니다. :)
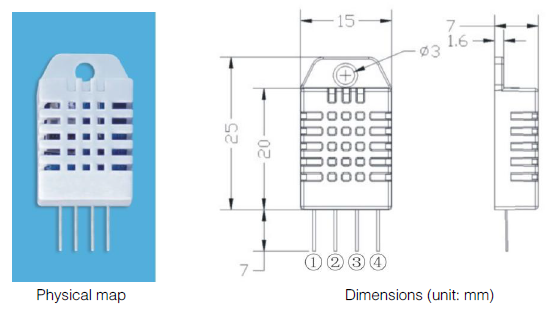
[DHT22 온습도센서]
이 센서는 메이커들에게 가장 대중적인 온습도 센서라고 생각합니다.
.png)
DHT22 온도센서 모듈의 핀배열은 위와 같습니다.
VDD와 GND연결은 1, 4번.
온도습도 데이터출력은 2번 핀입니다.
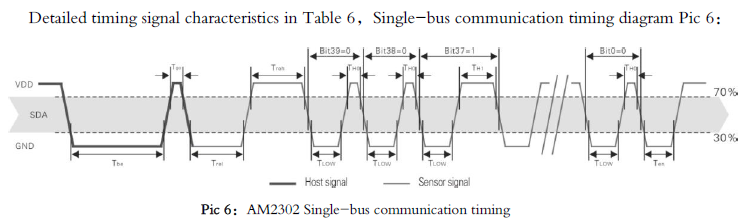
DHT22로부터 출력되는 온습도 시리얼 데이터를 해석하여 숫자로 변화하기 위해서는 아래와 같은 타이밍차트를 정확히 이해해야 하지만,
이 역시 아두이노 라이브러리를 사용하여 편하게 하면됩니다.
선택한 라이브러리는 adafruit DHT-sensor-library 입니다.
[온습도센서 연결]

[아두이노 코딩]
// 온습도센서 라이브러리 Include
#include <DHT.h>
#include <DHT_U.h>
#include <Arduino.h>
#include <TM1637Display.h> // 7SEG 디스플레이 라이브러리 Include
// Module connection pins (Digital Pins)
#define CLK 2 //아두이노 나노 Pin5(D2)
#define DIO 3 //아두이노 나노 Pin6(D3)
const int pinLED = 4; // LED 출력은 D4
const int pinButton = 5; // 스위치 입력은 D5
// 온습도센서 연결 핀 설정
#define DHTPIN 6 // 온습도센서 입력은 D6
// 사용 온습도센서 타입 설정
#define DHTTYPE DHT22 // DHT 22 (AM2302), AM2321
// 온습도센서 초기화
DHT dht(DHTPIN, DHTTYPE);
// 센서 리딩 에러 메시지를 표시할 세그먼트 데이터도 만들었습니다.
const uint8_t SEG_ERR[] = { //'Err'
0, // 앞 한자리는 깜깜
SEG_A | SEG_D | SEG_E | SEG_F | SEG_G, // E
SEG_E | SEG_G, // r
SEG_E | SEG_G // r
};
라이브러리 예제를 편집해 온습도 센서를 읽기 위한 코딩을 합니다.
void setup()
{
pinMode(pinLED, OUTPUT); //LED 연결된 핀을 출력모드로
pinMode(pinButton, INPUT); //스위치가 연결된 핀을 입력모드로
Serial.begin(9600); // 시리얼포트 초기화
Serial.println(F("DHTxx test!")); // 시작 메시지 전송
dht.begin(); // 온습도센서 초기화
}
// 온습도센서를 읽는 동안 상태 LED를 켜고, 센서 리딩이 끝나면 끄기
while (1) {
digitalWrite(pinLED, HIGH); // LED를 켭니다
float h = dht.readHumidity(); // 습도 읽기
float t = dht.readTemperature(); // 온도 읽기
float f = dht.readTemperature(true); //화씨 온도 읽기
digitalWrite(pinLED, LOW); // LED를 끕니다.
if (isnan(h) || isnan(t) || isnan(f)) { // 데이터 오류시
Serial.println(F("Failed to read from DHT sensor!")); // 에러 메시지 전송
display.setSegments(SEG_ERR); // 에러 메시지 표시
}
else {
ih = h * 10; // 부동소숫점 데이터를 정수로 변환
it = t * 10;
if(digitalRead(pinButton)) { // 스위치가 눌린 상태면
display.showNumberDecEx(ih, 0x20, false); // 습도 표시
delay(50); // 50ms 지연
}
else { // 스위치가 눌린 상태가 아니면
display.showNumberDecEx(it, 0x20, false); // 온도 표시
delay(50); // 50ms 지연
}
}
}
전체 코드는 아래 첨부했습니다.
#include <DHT.h>
#include <DHT_U.h>

#include <Arduino.h>
#include <TM1637Display.h>    // 7SEG 디스플레이 라이브러리 Include

// Module connection pins (Digital Pins)
#define CLK 2                 //아두이노 나노 Pin5(D2)
#define DIO 3                 //아두이노 나노 Pin6(D3)

const int pinLED = 4;         // LED 출력은 D4
const int pinButton = 5;      // 스위치 입력은 D5

#define DHTPIN 6              // 온습도센서 입력은 D6

// Uncomment whatever type you're using!
//#define DHTTYPE DHT11       // DHT 11
#define DHTTYPE DHT22         // DHT 22 (AM2302), AM2321
//#define DHTTYPE DHT21       // DHT 21 (AM2301)

// Connect pin 1 (on the left) of the sensor to +5V
// NOTE: If using a board with 3.3V logic like an Arduino Due connect pin 1
// to 3.3V instead of 5V!
// Connect pin 2 of the sensor to whatever your DHTPIN is
// Connect pin 4 (on the right) of the sensor to GROUND
// Connect a 10K resistor from pin 2 (data) to pin 1 (power) of the sensor

// Initialize DHT sensor.
// Note that older versions of this library took an optional third parameter to
// tweak the timings for faster processors.  This parameter is no longer needed
// as the current DHT reading algorithm adjusts itself to work on faster procs.
DHT dht(DHTPIN, DHTTYPE);

const uint8_t SEG_DONE[] = {                           //'donE'
      SEG_B | SEG_C | SEG_D | SEG_E | SEG_G,           // d
      SEG_A | SEG_B | SEG_C | SEG_D | SEG_E | SEG_F,   // O
      SEG_C | SEG_E | SEG_G,                           // n
      SEG_A | SEG_D | SEG_E | SEG_F | SEG_G            // E
      };

const uint8_t SEG_ON[] = {                              //'on'
      0,  0,                                            // 앞 두자리는 깜깜
      SEG_C | SEG_D | SEG_E | SEG_G,                    // o
      SEG_C | SEG_E | SEG_G                             // n
      };

const uint8_t SEG_OFF[] = {                             //'oFF'
      0,                                                // 앞 한자리는 깜깜
      SEG_C | SEG_D | SEG_E | SEG_G,                    // o
      SEG_A | SEG_E | SEG_F | SEG_G,                    // F
      SEG_A | SEG_E | SEG_F | SEG_G                     // F
      };

const uint8_t SEG_ERR[] = {                             //'Err'
      0,                                                // 앞 한자리는 깜깜
      SEG_A | SEG_D | SEG_E | SEG_F | SEG_G,            // E
      SEG_E | SEG_G,                                    // r
      SEG_E | SEG_G                                     // r
      };

TM1637Display display(CLK, DIO);

// The amount of time (in milliseconds) between tests
#define TEST_DELAY 2000          // 2초 지연

void setup()
{
  pinMode(pinLED, OUTPUT);       //LED 연결된 핀을 출력모드로
  pinMode(pinButton, INPUT);     //스위치가 연결된 핀을 입력모드로

  Serial.begin(9600);            // 시리얼포트 초기화
  Serial.println(F("DHTxx test!")); // 시작 메시지 전송

  dht.begin();                   // 온습도센서 초기화
}

void loop() {
  int k;
  uint8_t data[] = { 0xff, 0xff, 0xff, 0xff };    // 모든 세그먼트 켜기 값으로
  uint8_t blank[] = { 0x00, 0x00, 0x00, 0x00 };   // 모든 세그먼트 끄기 값으로
  display.setBrightness(0x0f);                    // 밝기를 최대로

  int ih;
  int it;

  // All segments on
  display.setSegments(data);          // 모두 켠 후에
  delay(TEST_DELAY);                  // 0.6초 대기
  display.setSegments(blank);         // 모두 끄기
  delay(TEST_DELAY);                  // 0.6초 대기

  while (1) {                         // 테스트 무한 반복

    digitalWrite(pinLED, HIGH);       // LED를 켭니다
    // Reading temperature or humidity takes about 250 milliseconds!
    // Sensor readings may also be up to 2 seconds 'old' (its a very slow sensor)
    float h = dht.readHumidity();
    // Read temperature as Celsius (the default)
    float t = dht.readTemperature();
    // Read temperature as Fahrenheit (isFahrenheit = true)
    float f = dht.readTemperature(true);
    digitalWrite(pinLED, LOW);        // LED를 끕니다.

    // Check if any reads failed and exit early (to try again).
    if (isnan(h) || isnan(t) || isnan(f)) {                 // 데이터 오류시
      Serial.println(F("Failed to read from DHT sensor!")); // 에러 메시지 전송
      display.setSegments(SEG_ERR);                         // 에러 메시지 표시
      //return;
    }
    else {
      // Compute heat index in Fahrenheit (the default)
      float hif = dht.computeHeatIndex(f, h);
      // Compute heat index in Celsius (isFahreheit = false)
      float hic = dht.computeHeatIndex(t, h, false);

      Serial.print(F("Humidity: "));            //시리얼 포트로 온습도 전송
      Serial.print(h);
      Serial.print(F("%  Temperature: "));
      Serial.print(t);
      Serial.print(F("°C "));
      Serial.print(f);
      Serial.print(F("°F  Heat index: "));
      Serial.print(hic);
      Serial.print(F("°C "));
      Serial.print(hif);
      Serial.println(F("°F"));

      ih = h * 10;                                // 부동소숫점 데이터를 정수로 변환
      it = t * 10;

      if(digitalRead(pinButton)) {                // 스위치가 눌린 상태면
        display.showNumberDecEx(ih, 0x20, false); // 습도 표시
        delay(50);                                // 50ms 지연
      }
      else {                                      // 스위치가 눌린 상태가 아니면
        display.showNumberDecEx(it, 0x20, false); // 온도 표시
        delay(50);                                // 50ms 지연
      }
    }
  }
}
** 기본 동작은 온도센서를 읽어 세그먼트 디스플레이에 표시하고
컵받침에서 습도는 필요 없지만, 스위치를 누르면 습도가 표시되도록 하였습니다.
** 온도센서 입력값 에러가 나는 경우 디스플레이에 ‘Err’ 메시지를 표시합니다.
로그인 후
참가 상태를 확인할 수 있습니다.